Wednesday, September 12, 2012

the latest news...


baby #2 is on the way :-) 
due may 17th!


i'm sooo excited - i can't imagine having 2 little loves to take care of everyday! being pregnant is quite the mix of emotions though - we've had baby fever for months and couldn't be more excited but, on the flip side, with emery i had the most awful pregnancy i could have imagined. if it's as bad as last time, i'm going to miss out on the next 3 months of emery's life, pretty much completely.

with emery, i started feeling sick right at week 4 but didn't actually get sick until 6 1/2 weeks. with this one, i started feeling sick at week 3 and got sick for the first time at week 4. not looking good.

one thing that gives me hope is the fact that our life style has changed so much since emery was born. with emery, i used everything the doctor could provide for me {meds, a trip to the ER for dehydration, vitamins, etc} to eliminate my sickness, just short of bringing a nurse into our home to keep me on an IV drip. {they really did offer. i didn't even know you could do that.}

this time around, as soon as i found out i was pregnant, i dove into natural pregnancy websites and blog posts to read all i could about relieving morning sickness. {just for the record, i hate calling it morning sickness. i have all-freaking-day sickness. morning sickness sounds like the clouds have parted, angels are signing, and a glorious gift has been bestowed upon me in the form of a promise that i will only get sick in the mornings. that sounds like a dream. when i say morning sickness, i feel like i'm lying and tell you i've been given that special gift. i haven't.}

this blog post is to track:
  • what i'm reading
  • things i'm trying
  • what worked and didn't work

i plan to update this with more info and keep it as a personal journal for future reference. if anyone else is looking for info on natural pregnancy, check out Modern Alternative Pregnancy. this link is what i've been pouring over for the last few days. 

so far i've already:
  • made some infused water {she said to do lemon water, but i also added ginger slices and crushed up fennel in a tea steeper.} last time i couldn't handle the intensity of the ginger candies, so i'm hoping a little ginger in my water will be enough to ease the feeling.
  • eaten straight fennel . i remembered her mentioning fennel was good for you, so yesterday while i was doubled over in the kitchen with my eyes closed, trying to think happy thoughts, i remembered her praise of fennel. i pulled it out off the spice drawer and ate a small handful. within a few minutes, i was good to go. {i think this will only help for mild nausea. when it gets too bad, things like this don't help me.}
  • increased my protein. 
    1. we picked up sprouted bread and bagels from whole foods last night, along with some organic valley grass-fed cream cheese. it made the perfect breakfast this morning. sprouted grains are also high in vitamin B {i was taking vitamin B supplements with my last pregnancy because it reduces nausea. i'm hoping my diet will eliminate the need for pills this time around.} 
    2. as i'm typing this, i'm finishing up an amazing bowl of lentil soup from my aunt. 
    3. i also got some raw pepitas {shelled pumpkin seeds} from whole foods and plan to cook them in mild spices later today to have on hand to munch. Andrew scouted out the nuts in the whole food bins and said pepitas and peanuts had the highest protien content.
  • worn sea sickness bands. these only help me in the first few weeks, but i'll take what i can get.
  • sipped pregnancy tea. there's a link to a homemade liquid vitamin recipe below that i plan to make this week, but in the mean time, Yogi pregnancy tea contains a lot of the same herbs.
in the coming days and weeks, i also plan to:
  • make homemade chicken broth to sip when i can't eat anything else.
  • make this homemade liquid multivitamin. read her post for the benefits of making your own vs taking a pill. only downer is that it has to steep for 6 weeks.
  • regularly visit the chiropractor. i didn't start going to a chiropractor until after emery was born. i had no idea that simple adjustments can help relieve nausea. i hope this helps!
  • get acupuncture. i hate hate hate needles. but i love my daughter more. if getting acupuncture means that i'll be well enough to have quality time with emery, then sign me up.

you could probably assume this, but if i'm as sick as last time, the blog is going to be pitiful for awhile. there might be a post here and there if i'm able to do things worth blogging about, but for the most part, i'll probably be in the bathroom on my knees. {or making the most of the little moments i can get with emery without loosing my lunch}

anyone else have any natural "morning" sickness remedies?? i'll take any advice i can get! i'll try to keep you posted on how the natural remedies work {or don't work} for me.

love and running to the bathroom,
amber.

Sunday, September 9, 2012

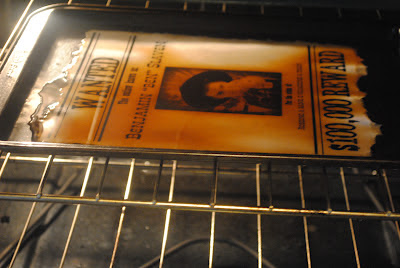
cowboy WANTED sign

my husband's love for football always means increased creative time for me. we have a history of chilling out in front of the TV - him engrossed in the game and telling me random facts about players while i get my craft on.

this week i had a rootin' tootin' fun time planning the decor for my husband's cousin's new cowboy bedroom! first project down - 

cowboy wanted sign
  • cardstock
  • coffee
  • oven
  • cookie sheet
  • printer
  • computer
i came across this idea on bellezaeluce.com, but she didn't have a tutorial. stink. i know very little about how to do things like this. i got my game face on and pretended like i knew what i was doing. google has the answers to everything, right? right.
  • i called up benjamin and had him tell me what he wanted his nickname and his crime to be! he had fun brainstorming his elaborate heist, but for space's sake, i had to narrow it down to bank robber and train hijacker.
  • if you want to add the lines {i use word 2010} go to "insert", then "shapes", select "line". once you have it lined up where you want, double click it. a new group of options will pop up at the top. select the down arrow on "shape outline" and then the arrow for "weight" to select the thickness of each line.
  • i originally had a sweet-faced picture of him from easter, but really now, what bad guy wants his smiling face on a wanted poster plastered all over town? not this one. he rounded up his cowboy gear and gave me quite the glare as i stared down the barrel of his gun. i'm super grateful he didn't pull the trigger.

  • following the same plan as i did for my Christmas ornaments, i printed this in black ink, tore the edges, placed it on a cookie sheet, poured about 1/4-1/2 cup coffee over it, and stuck it in a 200 degree oven.


  • it typically takes 15-20 minutes. you'll know it's done when the edges are peeling off the cookie sheet.


we're nailing it up on the wall as part of his cowboy decor. from the sound of it, i think he's pretty pumped to show his friends and my husband has declared it to be his favorite of all my projects. i love boys.

love and outlaws,
amber.

Thursday, September 6, 2012

fridge tree with magnet leaves.

i'm practically giddy thinking about september 22nd. it begins the seasonal wonderfulness that i look forward to every year and i'm so ready for emery to be a part of it!

i absolutely refuse to decorate for fall 1 day before fall actually begins. that being said, i couldn't help but start this project for emery so i could get it ready in time! if you're looking for seasonal fun for your little one, read on!
incase you want to get into my brain, here's how this project evolved. i was looking through my preschool curriculum, writing down anything that would be age appropriate for my 15 month old. when i got to the Fall curriculum, i remembered i had taped a tree to a cookie sheet for the kids and made magnet leaves for them to place on the tree. i immediately wanted to make one for emery and wrote it down on my list.

a few minutes later, i remembered this 
Felt play Christmas tree!!! Love this
that i found on pinterest from solandrachel.com a few months ago and thought was super cute. i loved the idea of making it huge and decided to do it on the fridge. it would save a cookie sheet from being held hostage for a few months, and a bigger tree equals more fun.

being the project-obsessed girl that i am, i immediately got started. {i'm the kind of person that has to start right when i think of it, or it will never get done} 

i taped construction paper to the fridge and then sat on the floor and stared at it in fear for a few minutes. flashbacks of a highschool self portrait came to mind when i tried to draw myself climbing a tree. my eraser was my best friend that semester. 


 after a good 5 minutes, i finally got on pinterest and found this
Pinned Image
thank you, thank you, to whoever made this. my branches don't look as ridiculous now. {i always want to draw trees with the trunk being one massive arrow with awkward branches coming off the side, rather than splitting it halfway up into a few different branches. this gave me a good visual on how to split them.}

i used clear tape and secured each place on the paper where a part of the tree overlapped from one page to the next.

then i got to work, cutting the tree out while it was still on the fridge. i didn't like the idea of wrestling with it and spinning it around as i cut each branch at a different angle. i'm lazy like that.
hmmm. it should be a little taller up top
{i've never seen a flat-top tree in real life}, but overall, i'm satisfied.
i took it off the fridge and tucked it away to keep it safe from curious hands until i could get it laminated. and then i cleaned the gobs of brown paper off the floor so my husband wouldn't know our kitchen had been a disaster.

next, i found clipart for leaves at this link. i printed them off {you should use cardstock. i didnt. it was harder.} and traced them on red, orange, and yellow construction paper. i used markers to highlight them and make them more interesting.

leaf template

{i did 45 leaves.}

PUBLIC SERVICE ANNOUNCEMENT: mardel will let you laminate stuff for 25 cents a foot. true story. i went and got these bad boys and a christmas tree version with ornaments laminated for $2.44. i walked out of the store one happy mamma.

see that fairly innocent bowl of chocolate chips?
i most definitely forgot they were there after emery woke up.
i went to clean the kitchen and came back to this:
good thing you're cute...
 the magnets i had on hand were really thin and i was nervous they weren't going to hold, so i went ahead and broke my "don't decorate early rule" put it all up just to make sure. it was a hit!


we are now sporting a diaper because her
chocolate drenched clothes are soaking
in oxyclean. does chocolate stain?
i dont know, but i keep ruining her clothes
so i wanted to play it safe.

love and leaves,
amber.

Friday, August 31, 2012

sports themed garland.

one of emery's favorite buddies turned 1 the other day. we absolutely love him and his family and were super excited to celebrate such a big occasion with them! 

when his mom, kim, told me what she had in mind for his party, i was even more excited! she took the idea from the sewn garland post and gave it a sports twist! i love everything about this party!


she made a sewn garland with his 
name and little footballs!

she created all the circles into different
sports balls before sewing them together!
she used a few extra balls as
labels around the drink table
 
she filled this with
ice and water bottles

one of my favorite tricks i
learned from my aunt -
draw different pictures
on the caps of water bottles
so you can tell drinks apart!
with 40+ people at a party,
this comes in handy!


the birthday boy!
kim made tommy this super cute sports shirt!
time for cake!


love and first birthdays,
amber.

Wednesday, August 29, 2012

letter R sensory bucket.

i love looking back on my life and seeing all the ways God directed me exactly where i needed to be, even before i was a believer. working at the preschool taught me so much and prepared me in so many ways for being a mom. the biggest bonus - all the stuff i bought for my classroom when i was single and had the cash to do it. i saved all of it for my future kids and am sooo thankful to have activities on hand! 

whenever we get bored, i tell emery we're going to pick something out of the super secret special activity room {also known as a closet in the basement}. i think it's her favorite room in the house!
toddler/preschooler activity: Letter R Sound Box

at the preschool, every week was devoted to a different letter. we would read a book specific to that letter, do an art project about the letter, and i would create centers themed around the letter. One of my centers for letter R was an R Sound Box...

Tools:
  • small rubbermaid container {i got this at the dollar store, but they also have them in sets of 5 at target.}
  • rice {or if you  do a different letter, pick something else, like confetti for C, pebbles for P, sand for S, etc.}
  • a few objects that start with your letter. i choose a ruler, rose, red ribbon, race car, ring, rooster, and rock. most of these i got at the dollar store.

obviously emery isn't learning what starts with what yet, but it's a fun sensory bucket just the same. I still talked with her about everything like she was 4, but she mostly just wanted to throw rice on the floor. all in all, it was a good day!

she loved finding all the treasures and she loved making a mess! 
i don't mind her doing it, as long as it's supervised and structured!

burying mommy's hand in the rice
love and the alphabet, 
amber.

PS - this post was featured on Creative Christian Mama's Linky Party! i'm more than a little pumped!

Thursday, August 23, 2012

throw it out thursday: eye make up remover.

when i ran out of eye make up remover a few months ago, we were in an unexpected financial bind. i didn't want to spend any extra money until i knew what was going to happen {long story} so i hopped on pinterest and started searching. 

i found TONS of eye make up remover recipes, but they were all AWFUL! maybe i was just spoiled with the effectiveness of the brand i had been using, but the recipes i was finding took 2-3 cotton rounds, burning eyes, and gobs of remover to get my eyes completely make up free. not cool.

i have also been on an insane blog kick - subscribing to tons of blogs through facebook and email so that i have to do less work when finding healthy alternatives - the research now comes to me! anyways, a few weeks before this, i had signed up for emails from http://www.crunchybetty.com. the wonderful lady read my mind and sent out an email about all natural face wash and eye make up remover. she only briefly mentioned that she used EVOO as eye make up remover, so i thought i would share what i did and give all the credit to her! the best part is the ingredient list: 


ingredients: 
  • EVOO
that's it. {maybe crunchy betty is crazy...surely there's more to it!?}

tools:
  • eye dropper {i got this one for under $3 at whole foods}
  • cotton round 

 directions:

  • i find this works best right after i've gotten out of the shower, or if i've held a hot wash cloth over my face for a minute, to soften the mascara.
  • soak the cotton round with water. squeeze out all excess. {i cannot stress how important this is. when i first tried EVOO as eye make up remover, i HATED it because i didn't do this. somehow it helps the olive oil spread better and not get globs in your eyes - which BURNS}
  • fill dropper all the way with EVOO, squirt evenly over cotton round. use fingers to spread it out more. 


  • remove eye make up as usual.


love and less chemicals,
amber.

Wednesday, August 22, 2012

how to quickly cut a watermelon.

a few years ago i was over at my husband's aunt house and as usual, she was working in the kitchen. i pretty much always sit at the counter and watch her work because i always learn something new at her house!

i dont even know that she knows this, but one particular day i'm pretty sure my eyes were bugging out of my head and my jaw was on the floor {but i think i was trying to play it cool because she was telling me story}

as a little background to this event - i got married when i was 19. i was super insecure in pretty much everything homemaking related and was pretty positive everyone out there knew exactly what they were doing except me. being 25 now and having talked with many married friends, i now know this isn't true. there are tons of homemakers out there that are totally winging it! i'm not alone!

so, back to my story. i went on with my life for years assuming everyone else knew this trick but me until just a few weeks ago my mom needed to cut up a watermelon and i offered to do it for her. she went upstairs for a few minutes and when she came back down, i was done. i'm pretty sure her eyes were bugging out of her head and her jaw was on the floor. she wanted to know how in the heck it didn't take me 14 hours to wrestle with and conquer the watermelon.

this, dear people, is the answer:

get yourself a watermelon.
and a knife.
and a cutting board.
cut the beast into 4 sections.
from the back of the rind
to the front of the fruit,
cut even sections.
then, coming down from the top,
cut from rind to rind
to make bite sized chunks.
then, going from front to back,
make the final cut, separating the chunks
from the rind and rest of the watermelon.
as you loosen a section,
keep the chunks on the knife,
secure them with your hand,
and dump them in the bowl.
pour the juice from the rind
into a glass and drink it!
have flashbacks to my honeymoon in mexico.
sit back and enjoy the fact
that you did that wicked fast.
if you're looking for something to do with all the watermelon you  bought and cut just to try out this trick, i have a solution. last night we made this amazing watermelon and arugula salad from the Whole Foods website. i left out the red onion cause we were going to someone's house and wanted to be able to talk to them after dinner, but you can leave it in if you don't mind onion breath. 

hopefully this helped some newbie 19 year old wife out there...if not, at least my mom now has photos to go along with my verbal explanation.

love and watermelon juice,
amber.