Wednesday, July 4, 2012

burlap picture frame earring holder.

this move has officially been harder than the last one. at our last place, we moved in to a smaller space that was quicker and easier to organize (and we had less stuff, having only been married 8 months). i was mostly done unpacking and organizing that night. this is not the case this time around. we have more stuff and a much different layout. we have a kid and a dog that we've acquired since our last move (and everything that comes with them), both making money and time more scarce. but, i wouldn't trade it for anything. i'm loving working on projects and seeing our home come together. i'm loving getting rid of excess to make our place less crowded and less work. my most recent project has finally left my dresser clutter free! hallelujah! one space at a time, it will get done!


creative idea #19: burlap picture frame earring holders
idea sparked by: i've seen these all over pinterest...

tools:

  • frames
  • burlap (or other very loose knit fabric)
  • hot glue gun
  • scissors

directions:

  • remove back from picture frame. if this is going to be a stand up frame, rip the hinge off the backing and throw the back away.
  • cut your burlap to size.

  • hot glue one side down, in 1-2 inch segments, pulling the burlap tight (along the length of the glue) to keep it from puckering.

  • repeat on all sides.

  • hot glue the hinge to the edge


my first one puckered a
lot because i didn't pull
it tight enough. the second
time around it looked
a lot better!


i love organizing, especially when it doubles as decor. i love how these look next to my tree branch jewelry holder!

how do you organize your jewelry?

love and beautiful storage,
amber.


Monday, June 25, 2012

glass jars: saving and reusing

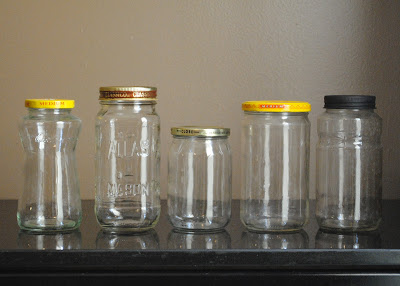
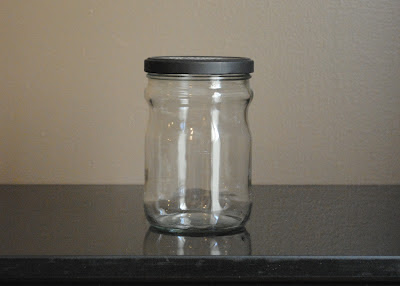
my friend and i were discussing my recent adventure with glass jars and i decided i should post about it. awhile back i read a blog post from keeper of the home where she briefly mentioned this topic and i got to thinking about how many free {kind of} glass jars i throw away ALL THE TIME!  you can do so many things with leftover glass jars from pasta sauce, pesto sauce, syrup, kombucha, milk, wheat germ, jams and jellies, peanut butter, salsa, vinegar, oil, artichokes, pickles, {do i need to go on?} each size and shape is perfect for a different thing and saves me money!


creative idea #18: saving and reusing glass jars
idea sparked by:www.keeperofthehome.org {i can't find the exact post}


  • first step - training yourself to remember not to throw away the jars! this was hard for me at first :-)


removing labels
  • for the longest time i'd been peeling off what i could of the label, soaking it in water, scrapping off what i could with my fingernails, and then sitting in front of a movie while rubbing goo-gone on all the bottles until they were clean. 
this is what i was previously scraping off with my 
fingernails, after soaking the bottles in water. 
with some jars it's a walk in the park, others, 
it's a marathon on a 100 degree day.
i'm seeing a little crash and burn in my future. 

luckily i came across a video on pinterest about how to easily remove labels. sadly, it doesn't remove the residue the goo-gone gets off, but i now no longer need to soak {taking up my sink and sometimes also a giant bowl on the counter} and scrape with my finger nails. HUGE time and space saver! plus, i kinda liked an excuse to pop in an old movie while being productive :-)
  • set oven for 200 degrees.
  • place jars on a cookie sheet or casserole dish.
  • leave in oven for 15 minutes
  • peel of sticker
  • *sadly this doesn't work for all labels because of the different types of glues different companies use*
this what residue was left over 
after the oven method. 
sooo much better!
  • use goo-gone and magic eraser to remove leftover residue. 

adding labels
this part is still on my to do list. i'm a sucker for good presentation - something about mis-matched lids does not make my heart go pitter patter.

  • chalkboard paint. perfect for a jar that will not always be used for the same thing. i'm not confident that throwing the painted lids in the dishwasher would go well, so i plan to always hand wash them.
  • stickers. perfect for jars filled with dried goods that will always be used for the same thing.

filling them up
ok, so now what? i have 8,000 bottles...what do i do with them? 

i'm so glad you asked.

let me take you on a tour of my glass collection {so far} and what i plan to do with each size and shape. {see the links for the recipes}

shatto milk bottles -
we're getting ready to start buying
raw milk from a dairy farm.
you must supply your own jars,
so what better to use than milk jars??
GT's kombucha bottles - 
again, genius strikes - when my kombucha
is ready to be refrigerated, i'll be
storing them in these. it's perfect
to have a quick drink to grab and my 

brewing jar is free to make the next batch. 
these would also make great water bottles.
tea of republic{left} and maple syrup{right} -
i use the small neck bottles for things like 
homemade dressings and homemade extracts
basically, anything i'll be pouring
not pictured
my small neck apple cider vinegar bottle from my 
post about infused orange vinegar. perfect for 
cleaning! it actually works better than the 
plastic one i had from target which leaked constantly.
salsa, spaghetti sauce, pickle, wheat germ jars, etc. -
these size bottles are great for: 


  • storing chopped onions 
  • freezing homemade chicken broth {i'm tired of buying ziplock bags, especially when i have "free" storage}
  • storing dry goods {nuts, lentils, grains, beans, etc}. 
  • i use the spaghetti jars when i make homemade yogurt. 
  • i keep my homemade mod podge in a jar this size
  • i store bacon grease in the fridge in one of these.
Santa Cruz Organic Juice -
i got these when they were on sale
$1/bottle and they're perfect for storing
unsweetend tea
for emery. i've been reading
about what combinations of herbs are good
for certain things for baby, and how much
healthier tea is than juice. these are
perfect for each brew. i also use these for the second fermentation of kombucha, to free up my brewing jars.
pesto & small artichoke jars - 
  • call me crazy, but i store pesto in these. now that my basil plant is doing well, i'll be making and freezing pesto soon!
  • i just made my first batch of homemade lotion and these jars are perfect because you can reach to the bottom to get every last bit of lotion out. 
  • these would also be great for the dry rubs andrew makes all the time for grilling 
sam's club artichoke jar -
this is my biggest jar - i can't wait to get more!


  • also great for dried bulk items or things like baking soda, brown sugar, powdered sugar, etc.
the possibilities are endless! as i'm writing this, i keep thinking of new things to add! my friend is starting to save jars for cute christmas gifts! if you have any ideas to add to the list, i'd love to hear them!


love and free storage,
amber.


Monday, June 11, 2012

infused orange vinegar cleaner.

awhile back andrew and i started our journey toward healthy eating. we've learned so much that sometimes our heads hurt, but we feel great because of the hardcore changes we're making, even if other people think we're crazy! {it's unavoidable. everyone thinks someone's crazy, why not us?} one of the things i'm learning is that YOU AREN'T JUST WHAT YOU EAT. you are also what you put on your body, what you inhale, what your food touches and absorbs, etc. it should be no surprise to people when they are diagnosed with a disease - almost everything modern is chock full of horrible, man-made things God didn't design our bodies to process. people's bodies eventually can't take it anymore and something goes awry. do i think that radically changing the things we eat, use to store our food, put on our bodies, etc will save us from any illness ever? no. but i do believe many illnesses are unintentionally self-inflicted by the things we consume. 

i know that God is sovereign and that He has complete control over what does or doesn't happen to me and my family. However, i also know that i have a responsibly to take care of my family to the best of my abilities. if i know something i'm exposing them to isn't safe and it's in my power to fix it, i need to. if our quality of life and ability to serve God can improve, i need to make it happen. i've seen first hand how changing these things helps us to feel better, have better mental clarity, less headaches, and more energy, just to name a few. yes it's a lot of work, but to make it happen, i'm prioritizing and cutting out less important things from my day. 

i've decided to throw in our healthy lifestyle changes in the mix of the blog. i can't stop learning new things and i'd love to share bits and pieces with you! 

{oh - and PS: 9 times out of 10, the homemade, healthier version of anything ends up being cheaper. big perk.}

creative idea #16: Orange Vinegar Cleaner.
idea sparked by: fountainavenuekitchen.com

i've gone back and forth in the past with vinegar and baking soda to clean, but andrew loves the smell of store bought cleaners. finally we can both agree on a cleaning method! after soaking, this hardly smells like vinegar! the orange smell is marvelous! i was worried this was going to be sticky, but because it's just the peel soaking and none of the fruit, my surfaces have no residue! love this stuff!

{day 1}

{day 14}


ingredients/tools:

  • large glass jar (we're working on eliminating plastic from our lives. obviously not done yet...only had a plastic spray bottle.)
  • white vinegar
  • citrus peels (i chose tangelos - super easy to peel. clementines would be great too)
  • strainer
  • bowl
  • cheese cloth
  • funnel
  • spray bottle
directions:
  • place peels in glass jar, cover with vinegar. close and leave to sit for 2 weeks.
  • remove lid, strain vinegar into bowl. toss peels.
  • i was expecting this to remove all the floaties, but it didn't. i poured the liquid back into the jar, pulled out a cheese cloth, and strained it into the bowl again. much better.

  • use the funnel to pour vinegar into spray bottle.
  • check out this  page for things you can clean with vinegar.

love and happy cleaning,
amber.

PS - after some hunting, look what fun fact i found online:
method sprayer 
+ bragg's apple cider vinegar bottle 
= glass spray bottle!

Wednesday, June 6, 2012

quick chickpea curry.

martha stewart rarely lets me down. this Quick Chickpea Curry is no exception...
creative "idea" #15 {can i call this an idea if i'm just posting her recipe? idk.}: Quick Chickpea Curry. {serves 4-5}
idea sparked by: martha stewart.

ingredients:
mise en place.

  • 2 TB EVOO
  • 2 large yellow onions, diced
  • 6 garlic cloves, minced
  • 2 TB curry powder
  • 2 three inch cinnamon sticks
  • 1/4 tsp ground cloves
  • 4 cans chickpeas, rinsed and drained 
  • 6 TB ketchup
  • salt and freshly ground pepper
  • 4 cups water
  • chopped cilantro 
directions:
  • in a large, straight sided skillet, heat oil over med-high heat. Add onion and cook, stirring occasionally, until dark brown around edges, about 6 minutes.
it's my firm belief that all onions
are born to be caramelized,
no matter what the recipe
actually says to do to them.
  • add garlic, curry, cinnamon, and cloves; stir until fragrant, 30 seconds.

  • add chickpeas, ketchup, 2 tsp salt, 1/2 tsp pepper, and 4 cups water.


  • bring to a boil. reduce to a simmer, cover and cook 20 minutes.
  • uncover and increase the heat to medium high; cook until sauce is slightly reduced, 5 minutes.
  • serve topped with cilantro.

these cilantro proportions were for
aesthetic purposes only. as soon as the
camera snapped, my bowl was covered in green.
i heart cilantro.

ingredients:

  • 2 TB EVOO
  • 2 large yellow onions, diced
  • 6 garlic cloves, minced
  • 2 TB curry powder
  • 2 three inch cinnamon sticks
  • 1/4 tsp ground cloves
  • 4 cans chickpeas, rinsed and drained 
  • 6 TB ketchup
  • salt and freshly ground pepper
  • 4 cups water
  • chopped cilantro 
directions:
  • in a large, straight sided skillet, heat oil over med-high heat. Add onion and cook, stirring occasionally, until dark brown around edges, about 6 minutes.
  • add garlic, curry, cinnamon, and cloves; stir until fragrant, 30 seconds.
  • add chickpeas, ketchup, 2 tsp salt, 1/2 tsp pepper, and 4 cups water.
  • bring to a boil. reduce to a simmer, cover and cook 20 minutes.
  • uncover and increase the heat to medium high; cook until sauce is slightly reduced, 5 minutes.
  • serve topped with cilantro


i love this recipe and make it often. it's cheap, full of flavor, and gooooooood. my 13 month old ate it faster than i did. please, make this and then tell me what you think :-)


love and chickpeas,

amber.

Tuesday, June 5, 2012

photo thank you cards.

what better way to finish the sporadic birthday series than with thank you cards? i love to do photo cards because they're cheaper, less likely to get thrown away {fridge, anyone?}, and more personal. i do believe the final product was my plan E, but it all worked out in the end.

creative idea #14: photo thank you cards
idea sparked by: blog.alainmartinez.com {very last pic}


tools:

  • scrapbook paper {9 pieces of 8x11}
  • card stock {9 pieces of 8x11}
  • ruler
  • pencil
  • scissors
  • tape
  • something to string banner with {optional}
  • hot glue gun (optional)
  • computer + printer
  • something round to trace circles around letters {optional. i used a bowl}
  • camera
  • baby
  • props {optional}
  • avery 5164 labels {optional}
  • post card stamps
directions:
  • to make a banner triangle the full size of an 8x11 piece of paper, use a ruler to mark the center of the bottom of the piece of scrapbook paper. trace one line from that point to each of the top corners, to make a triangle. repeat with all scrapbook paper.
  • on the computer, type out THANK YOU! in desired font and color, sized to fit your triangles. print on cardstock
  • either cut them out right on the letter, or use a round object to trace a circle around them. {i put the circle on the paper and held it up to the light to make sure the letter was centered before tracing}. cut out.
  • tape the letters to the triangles
  • i was originally going to do this outside and have the banner hot glued on to lace ribbon and hanging from 2 chairs, but i needed to get these done quick so i taped them to the wall instead{no trip to the park necessary}. you choose your plan of attack.
  • photograph your adorable subject with desired props.


  • edit and print photos.
  • because my hand writing isn't the best and i thought it would be fun, i printed out individual thank yous from emery in kid font. i let each person know what emery loved to do with their gift! i printed these on the avery 5164 labels and stuck them on the back of the photo.

what are your favorite thank you card ideas??

love and gratitude,
amber.


Sunday, May 27, 2012

basil pesto, mozzarella, tomato panini.

these are andrew's 3 favorite things. i think he could live off them. whenever i make caprese salad, caprese bites, and now these delicious sandwiches, i'm guaranteed to hear about it all day long. we had them for lunch today and i can't tell you how many times he's asked when we can have them again. tomorrow, my love. tomorrow.


creative idea #12: Basil Pesto, Mozzarella, Tomato Panini
idea sparked by:http://foodgawker.com 
part 1: 
  • pesto-

    • ingredients:


        1. 2 cups packed fresh basil leaves
        2. 2 cloves garlic
        3. 1/4 cup pine nuts 
        4. 2/3 cup EVOO
        5. Kosher salt and freshly ground black pepper, to taste
      • directions
    1. combine the basil, garlic, and pine nuts in a food processor until coarsely chopped. 
    2. add oil and process until smooth. Season with salt and pepper.


    part 2:
    • panini-
      • ingredients
        1. pesto
        2. crusty french loaf, cut into 8 slices {we had different bread on hand}
        3. tomatoes {we had grape on hand, but large tomatoes would work great too!}
        4. fresh mozzarella
        5. EVOO for brushing
      • directions:
        1. spread pesto over all slices {i only used half the amount of pesto in the pics because we didn't have enough basil. next time we're going all the way.}


          2. slice tomatoes and mozzarella. arrange on bread.

    3. Place on george forman, panini press, or in a pan with a heavy pan on top to weigh bread down.

            4. brush top with EVOO. squish.
            
            5. eat this wonderful sandwich and leave your husband asking when you can have this goodness again.


    Basil Pesto, Mozzarella, Tomato Panini
    pesto:
    • 2 cups packed fresh basil leaves
    • 2 cloves garlic
    • 1/4 cup pine nuts 
    • 2/3 cup EVOO
    • Kosher salt and freshly ground black pepper, to taste

      • directions
        1. combine the basil, garlic, and pine nuts in a food processor until coarsely chopped. 
        2. add oil and process until smooth. Season with salt and pepper.

    4 paninis:

    • pesto
    • crusty french loaf, cut into 8 slices 
    • tomatoes 
    • fresh mozzarella
    • EVOO for brushing
      • directions:
        1. spread pesto over all slices {i only used half the amount of pesto in the pics because we didn't have enough basil. next time we're going all the way.}
        2. slice tomatoes and mozzarella. arrange on bread.
        3. Place on george forman, panini press, or in a pan with a heavy pan on top to weigh bread down.
        4. brush top with EVOO. squish.
        5. eat.

    love and happy husbands,
    amber.