Thursday, April 26, 2012

painting with baby + postcard puzzle.

today emery and i wanted to make a present to send in the mail. there are only so many ways an 11 month old can get crafty. we combined 2 ideas and made a fun postcard puzzle for far away family!


creative idea #8: painting with baby + postcard puzzle
ideas sparked by: www.momtastic.com & www.ohhappyday.com


Tools: 

  • poster board {we cut ours in half}
  • 1 ziplock bag {we used gallon size}
  • paint
  • blue tape
  • scissors
  • ruler


Directions:
  • squirt paint randomly on poster board
  • cut the zipper and 2 sides off ziplock bag so that when you open it it's one long sheet {i cut mine into two for this and wish i hadn't. emery found it fast and wanted to open it}
  • tape bag over paint with blue tape
  • let baby go to town! i showed emery how to pat it, she crawled on it, walked on it, etc. After she was done we peeled off the tape and added some painted baby foot prints to fill in the empty spots.

  • Let dry
  • You can stop here, obviously, but we kept going. I filled in some fun doodles so that it could be a puzzle. Then i cut the poster board in half and then cut each half into 4 postcard sized pieces.
  • I flipped them all over and wrote a small message that started at the bottom of the first postcard and went all the way down to the last postcard {it was only one line on each card. when the puzzle is put together, they'll be able to read the message}
can't wait for them to get their mail!

what other activities are good for babies? i'm always looking for ideas...


love and artwork,
amber.


Monday, April 23, 2012

clipboard/chalkboard menu planner.

i'm pretty excited about this post because there's a little bitty chance this idea is actually original. don't quote me on it, but i haven't come across it anywhere else {yet}.

i've been searching for months for the perfect solution to my weekly meal planning. i've found tons of great ideas, but none of them have been quite right for us. 

this all started awhile back when andrew asked me to start posting a list of every meal we were going to eat for the week somewhere in the kitchen where he could see it. He loves knowing what my plan is so he's less tempted to suggest eating out. I searched and searched and searched online to see how other people manage their meal planning. Each idea had at least one con for our family...

style #1 - the pre-made card system. 
menu organization lorieb
{i can't find the 
original poster of this. 
none of the pinterest 
links lead to original pages}
  • how it works: these types of meal planners consist of 20 or so cards that have permanent meals on them that you hang on a calendar indicating the day you're going to make it.
  • why i didnt like this one: andrew and i love to cook. we rarely repeat meals because we're constantly trying new things. there's no way we could only cycle through the same 20 recipes, we'd go crazy. if we were to make a card for every recipe we've made and liked, we'd go broke on scrapbook paper. and i'd go crazy having so many pieces of paper to store. and the idea of putting it all together seemed like too much work. {need any more reasons?}
  • who this works great for: people who don't love being in the kitchen, people who have recipes that they love to repeat, busy families, etc.
style #2 - printable menu planners
weekly menu planner downloads
{designfinch.com}
  • how it works: chose a template that works best for you, print them off weekly, and fill in with the weeks meals
  • why i didn't like this one: first, i couldn't find a template i liked. most of them were just for dinner - i needed one for all 3 meals and a section for snacks for the week. I finally ended up making my own basic spread sheet in excel with what little computer skills i have. it worked great until my new printer ran out of ink for the first time and i found out it cost $50+ for a new cartridge. I would like as few reasons as possible to have to pay that again anytime soon.
  • who this works great for: people who are wanting to plan just dinner. people who don't mind shelling out the cash for ink.
style #3 - the wipe off board menu
menu board
{familycorner.blogspot.com}

  • how it works: fill a frame with scrapbook paper, add stickers to spell out the days of the week, and use wipe off markers to fill in the menu.
  • why i didn't like this one: for the record, this was my favorite of the ones that weren't right for us. it saved me money and the recipes weren't limited. However, i wanted something that was a little more helpful - my recipes were in a pile on the kitchen table, taking up space.
  • who this is good for: people who have a great plan on storing their recipes for the week :-)
style #4 - my ah-ha moment - 


creative idea # 7: the clipboard/chalkboard menu planner.

tools: 
  • clipboard
  • chalkboard paint {here's how you make it}
  • a different color paint or sticker letters
  • paint brush
  • blue tape
directions:
  • paint a clipboard {front and back} with chalkboard paint. 
  • Paint or use sticker letters to make your desired template ON THE BACK of the clipboard. 
  • Use the front of the clipboard to hold the recipes for the week. 
  • Hang up! {we chose to hang it inside a cabinet door to remove visual clutter}

side notes: 
  • i plan on buying these because writing in small spaces with regular chalk is ridiculously hard. 
  • when cooking, i finally discovered my favorite new trick - i use a magnet to hold my recipe on the range above the stove. I used to constantly search for my recipe while cooking because i would move it around to all the diff spots i was working. i love keeping it on the range because i always know where it is and i can read the next steps while i'm stirring!


how do you organize your weekly menu??


love and chalkboard paint,
amber.

Friday, April 13, 2012

tree branch jewelry holder.

good thing i'm not one of those bloggers that maps out her blogging goals for the next year, planning to post on a regular basis about predetermined topics, cause i'd get an F. 


this blog is strictly about what i'm already doing. i will never make up a project just to do a blog post. my daily projects lately have consisted of packing, moving, deep cleaning, unpacking, and rearranging. not blog worthy, therefore, no posts in the last 3 months. {i'm pretty sure the 5 people that maybe read this blog don't care at all anyways.} but, along the way there have been a few projects...unfortunately in my rush to get them done, i didn't take step by step photos, but here are the end results and the tutorial :-D

{yes, i know, 
this thing is a beast.}


creative idea # 6: tree branch jewelry holder
idea sparked by: PrettyHandyGirl
     {first, let me just start all this by saying, go look at this girl's tutorial, please. I will never ever tell you my version is cooler than her's. ever. in my need for speed to complete all the projects i've had since we moved, i was looking for something quicker than the amazing quality job she did on her's. if you're looking for a quick fix, aren't super handy, and/or have already written a thousand page honey-do list for your husband, try out my quick version}


tools:

  • sticks {with as many branches as you can find. we found huge ones in our new yard from our neighbor's trimmed tree. (i kinda wish we had to go hunt in the woods for them though. free date night!) i cut them to size and trimmed the branches shorter to make the jewelry more easily accessible}
  • super glue
  • flower pot
  • river rocks {$1 at the dollar store}
  • chip clip

directions:
  • arrange the sticks in your hand like you would hold a flower bouquet. make sure they're pointing in different directions to make it more visually appealing.
  • still keeping them in place, set them in your flower pot and fill pot half way with river rocks. let go. {yes, they are going to move, but i wanted them to be in the general area they would be in the end so i wouldn't have to poke them into the rocks over and over before deciding where they should go.}
  • the way you tackle this next step will depend on how thick your sticks are at the base. Mine were thick, so i chose 2 of them, super glued them together right above the rocks, and used the chip clip to hold them together. An hour or so later i came back and glued the next one on and clipped it together again. If your sticks are thinner, you could maybe do them all at once. {just  be careful not to glue the chip clip to the branches. no, this didn't almost happen to me...}
  • after the glue is dried, remove the clip and fill the pot the rest of the way with the rocks. 
  • hang jewelry. be happy. maybe blog about it. enjoy the fact that your jewelry is no longer tangled and completely taking up the entire top of your dresser. {i did all of the above.}
love and tree branches, 
amber.

Tuesday, January 17, 2012

mason salt jar.

i always want to start each post with "this is my new favorite thing", but that's not very original and really, how many favorites can one girl have? 


a lot.


i've discovered that i love mason jars. they are wonderful, versatile, fairly cheap, easy to find, beautiful, and wonderful. i came across the easiest project ever on pinterest, and to make it even better, it cost me nothing. those are the best kinds of projects. 


creative idea #5: mason salt jar
idea sparked by: TheCraftPatch


tools:
  • mason jar
  • salt with round top [i don't recommend the salt at Aldi - the pour spout was covered in gunk. note the difference between the tutorial pics and the finished product, which has a Morton brand spout]
  • scissors
  • pen or pencil
  • Exacto knife
  • felt or other thick fabric
  • scrapbook paper
directions:


  •  remove top from salt container.
  • cut off the rim.


  • remove the lid from the mason jar. use the lid to cut the salt top to size.
  • awesome? yes. attractive? no. 
  • use the mason jar lid and pencil to trace scrapbook paper to fit. cut it out.
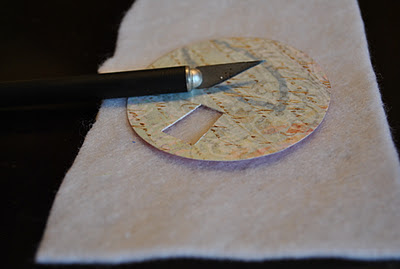
  • set the salt top on the scrapbook paper. Pull the spout open, stick your pencil in the hole, and trace the spout shape.
  • set the scrapbook paper on the felt [to keep from scraping the table] and cut AROUND [not on] the shape you traced [it needs to be a bit bigger than what you traced or it wont fit]

  • pour salt in mason jar, fit scrapbook paper over salt top, place new top in mason jar ring, screw on tight.

now, every time a recipe calls for salt, my heart skips a beat. mason jars are way better than cardboard tubes. i'm all about any little thing that makes life more beautiful and cooking more fun, especially if it can be done on the cheap.

the blogger at TheCraftPatch used her jar for yeast because she bakes a lot. if you think of something else this could be used for, i'd love to hear it!

love and a girly kitchen,
amber.

Thursday, January 12, 2012

antiquing paper.

this is one of my new favorite things. like always, i came across it on pinterest. i was searching for a way to make old and worn ornaments for our church's Journey to Judea Christmas event and this was so cheap, easy, and amazing that i couldn't pass it up.


creative idea #4: antique Paper {in this case, for ornaments}
idea sparked by: AGlimpseInsideBlog


Materials:


  • paper {can be from a book or something you print off yourself. If printing, do this before you start. I chose card stock for a more sturdy ornament Also, i tried printing in brown the first time i did this, only to have it fade more than i was wanting. it looked great for some things, but for this, i preferred to print in black (which didn't fade). Play around with it!}
  • cookie sheet
  • coffee
  • oven mit
Directions:
  • preheat oven to 200
  • lay your paper on the cookie sheet {you can do straight edges, or tear them.}
  • pour just enough coffee to cover the paper. {for this mini sized cookie sheet and one piece of paper, i used less than a 1/4 cup}


{sorry, i haven't perfected my taking-pictures-in-a-dark-oven skills...}
  • set the timer for 20 min. it prob wont be done that quick, but use it as a gauge for how much longer you should leave it in for. You'll know it's done when the edges start to peel off the cookie sheet. if it didn't peel off very high, take a butter knife and gently pop off the rest of the edges.

  • get creative with how you use these! You can frame them, glue string to the back for an ornament, or as the blogger at AGlimpseInside did, you can make multiple, roll them up, tie them with hemp, and put them in a vase :-)
love and good uses for coffee,
amber.

Thursday, January 5, 2012

my decoupage addiction.

there's no exaggerating here, i really am addicted. i would decoupage everything in our house if i could, but so far i've only covered 2 pieces of furniture :-) this project was an old bookcase from my parents that needed a little love. Warning, this is a project from a few years ago and my pics are not too hot. oh well. i still like the bookcase.
creative idea #3: map bookcase
idea sparked by: sweet decoupage projects everywhere!


for those of you who have never decoupaged - it's super easy! all you need is:

  • Mod Podge {or you can make it yourself by mixing 50% water and 50% glue in an empty bottle and shaking it up}
  • a paint brush
  • an object {furniture, clip board, box, etc, etc.}
  • whatever you want to cover it with {fabric, scrapbook paper, maps, newspaper, etc.}


Step 1 - cover a medium sized section with Mod Podge. if you do too much at a time it will dry before you can get it covered. also, try to keep your brush tip in the glue so it doesn't dry out.


Step 2 - working quickly, cover glue with desired amount of paper. if you want, you can crumple the paper, flatten it out, and tear into sections. i preferred this so my perfectionist self would be ok with things not lining up or the maps bubbling up as they dried. i started by covering the top with one map and then folding the excess over the sides of the bookcase.


i continued by tearing off the most interesting parts of the maps {found in old National Geographic Magazines} so that every part of my bookcase would be appealing.


ta-da! all done! it took me two days off and on, and i'm so excited about the way it looks. i love decoupage because the possibilities are endless - don't overlook the cheap dresser on craigslist that looks hideous - cover it with something beautiful, replace the knobs, and you have something unique to match your space :-)


love and mod podge,
amber.

Thursday, December 29, 2011

milk and cookie upgrade.

hopefully i’ll be posting more frequently than this, but it was Christmas, so i was a little busy! hope your Christmas was marvelous!

mine was spent hosting and hosting and hosting – one of my favorite things to do, especially when it comes to my cousins. they were in town for 10 days from a 13 month vacation. they are currently traveling all 50 states in an RV {check out their blog – www.50StatesandRolling.blogspot.com} while someone else is living in their home. 

since they couldn't host parties at their place, i offered for them to host in our cozy little abode. to make it an extra special occasion for the girls, who miss their friends terribly, i made fun party drinks for them! here’s the how-to!


Creative Idea # 2: The Milk and Cookie Upgrade
Idea sparked by: MixingBowlKids
                 {pretend like my photos are half as good as hers. please.}  


{How fun are these?!? 
Cookie is on a stick for easy dipping!}

Ingredients and Tools: 
   cookie dough
    cookie scoop
    cookie sheet
    candy sticks {i got mine from Michaels}
    glasses
    chocolate for melting
    sprinkles
    milk
    
Directions:

Step 1 - Form cookie dough into balls with cookie scoop and place each ball on top of a candy stick on a lightly greased cookie sheet. {or you can poke the stick in the cookie dough ball} Bake cookies like normal. Let cool before removing from cookie sheet.


Step 2 - meanwhile, melt chocolate on the stove. once melted, slowly and gently dip the rim in the chocolate. the blogger at heygorg.com dipped her glasses much deeper than mine. i preferred a thin rim because i had less dripping to worry about. turn the glass around a few times to let the chocolate take shape before dipping into the sprinkles 

Step 3 - Fill glasses with milk. Remove cookies from cookie sheet and gently place on rims of glass. {However, if i ever get the chance to make these again, i think i would prefer to display the cookies like you usually see cake pops and have more than one per person.}


i did a few things differently than Jan on MixingBowlKids - i choose to dip the rims in chocolate - she said to do agave or honey. Also, i did my cookies on the end of the stick, she did her's in the middle. Tweak it to your preferences! 


enjoy! if you have questions or comments, i'd love to hear them!

love and milk mustaches,
amber.